Posted on 1 Comment

Water , Water, Everywhere – Julie Gilbert Pollard Workshop

Oil painting of reflecting water scene, in Julie Gilbert Pollard workshop - first try
Oil painting of reflecting water scene, in Julie Gilbert Pollard workshop - first try Oil painting of reflecting water scene, in Julie Gilbert Pollard workshop, second try
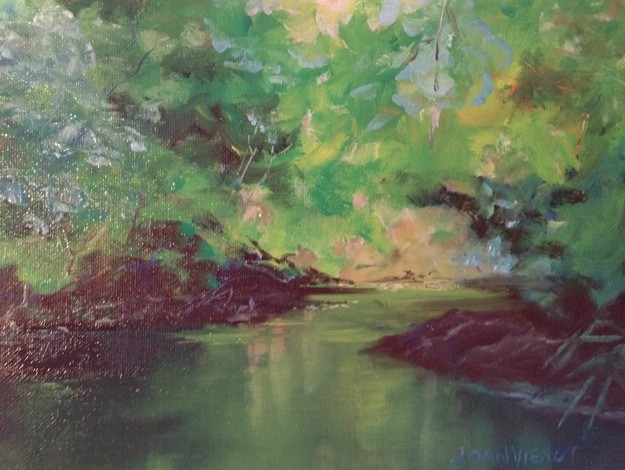
Last week I learned that water can see.  Who knew?!  That was just one of the hundreds of tips Julie Gilbert Pollard gave in her workshop in Panama City Beach, Florida, “Wet and Wild:  Painting Vibrant Water Scenes in Brilliant Color”.  This tip came on the first day, when we were working on reflections.  In other words, Julie said, “Water reflects as if you were looking at the scene from its vantage point.”  To illustrate, if a dead tree is angled out over the water sideways to the viewer, the reflection is a reverse mirror image, the same size and directly underneath the tree, in reverse angle.  But if the tree is angled towards the viewer, the tree above the water will appear shorter due to foreshortening, but the reflection will be much longer in proportion, because the water is “seeing” the tree from underneath.

So I look at reflections differently now.  I look at color and shapes differently too.  Everything is more colorful since that workshop, and I am seeing much better.  I find this is always the case after any period of immersion in art, that I see better and am more aware of colors and shapes.  One of the other participants in the workshop said that one of the few things you get better at as you age, is art.  I laughed, but I understand that statement.

We worked in the classroom, from sample photographs Julie provided which illustrated the concepts and techniques she was teaching.  She used the first four chapters of her Adventurous Oils, a Workbook Companion to Brilliant Color as well as several hand-outs.  It was a treat being taught by someone who understands how artists learn, who was able to paint and talk at the same time (no small feat, integrating both the left and right brain at the same time!), and who was able to provide constructive assistance as we worked on our various pieces.  And the participants were a happy bunch, the paint-mixing and experimentation punctuated with their softly-spoken stories to their table-mate and their laughter.  My own table-mate, Faye Gibson, owner of Meacham Howell Design, also was using oil paint;  the rest were painting with watercolor.  Since the instructor was giving demonstrations in both watercolor and in oil painting, I brought in a 6-color Walmart watercolor set and made a watercolor painting and then painted an oil painting the second day when we were studying waves, shown at left.  The watercolor painting was snatched up by a good friend of mine as soon as I posted it on Facebook.

Watercolor painting of wave, in Julie Gilbert Pollard workshop

Oil painting of wave, in Julie Gilbert Pollard workshop

Oil painting of a cascading waterfall, painted with palette knife, in Julie Gilbert Pollard workshopThe third day we studied cascading water.  Julie teaches cascading water as if it were a gathered skirt of a wedding dress, with the initial drop being the waist and flowing skirt, followed by a ruffle of white where it splashes down on the pond below, with a “train of lace” surrounding the splash on the flat pond.  I painted my first palette knife painting that day.  Clean-up is much easier at the end of a knife painting — all you have to clean is the knife!

The fourth and fifth days we were supposed to finish the paintings we had started the first 3 days, but I had already finished mine and painted a second one each day too.  Plein air painting has made me pretty quick.  So the fourth day I cut a few flowers off the crepe myrtle bush in the parking lot, and put them in a pitcher of water on my desk, thinking I would learn to paint the pitcher full of water.  But the flowers fascinated me, so I painted them primarily, with only a suggestion of the pitcher underneath.  Our technique for the day was negative painting, where you paint the negative space surrounding the form.  My efforts taught me the techniques, but made the painting very twiggy, so the following day I painted out most of the twigs and branches, and it became flowers again.

Oil painting of a wave, painted with bright colors as a value study of color, in Julie Gilbert Pollard workshop

Photograph of bright color painting, de-saturated to show values of pure colors

On the final day, the technique assignment was to paint a scene in pure color, using colors straight out of the tube, or pre-mixed, using colors for their inherent light-dark values instead of as color.  I again painted with a palette knife, using the wave photos for reference.  Anywhere there were dark values in the painting, I used ultramarine blue, violet, and reds, and cobalt green, lavender, and orange for the middle values, and orange and yellow for the lighter values, with white for the froth.  The idea was that if you took away the color, the painting would read correctly as a black-white-gray value study.  So I took a photograph of my painting, and then de-saturated it to remove the color, and was pleasantly surprised that indeed, it looks “right” as a value study.

To top off the workshop, there was a drawing for one of the instructor’s paintings, and I won it!  Icing on the cake!

Photo by Helen Balance, Beach Art Group Joan Vienot with Julie Gilbert Pollard
Photo by Helen Ballance, Beach Art Group
Incomplete oil painting in progress, crepe myrtle, negative painting assignment, in Julie Gilbert Pollard workshop Oil painting of crepe myrtle flowers, in Julie Gilbert Pollard workshop

Posted on Leave a comment

Types of Lighting

I think of lighting as being one of three primary types:  silhouette, which has the most impact if the shape is recognizable by its external contour;  high contrast, which treats all of the lighted areas as one light value, and treats all of the shadowed areas as one dark value, or perhaps using only 3 or 4 values; and the last type of lighting, full gradual shading ranging from white through the entire value scale to black, which sometimes is referred to as chiaroscuro, exmplified by the image found in the Art Studio Chalkboard website.

I rarely work on a figure drawing after I get back to my home studio, except to correct a glaring mistake, or to clean up a smudge here or there.  But two weeks ago, the model gave us a beautiful pose, and I was unhappy with the drawing I made during the figure drawing session.  So I took a new sheet of paper, and redrew the pose using brown ink, showing only the primary two or three values, and leaving a lot of the edges undefined where light was hitting them.  This treatment gives the drawing a completely different feeling.

The pose interested me because the model was leaning down with his elbow and forearm on one knee, which foreshortened his torso.

Most of my images are available for purchase.  Contact me if you are interested. — Joan Vienot

Posted on Leave a comment

Figure Drawing in a New Venue

It was interesting to draw in a new location last week.  Studio b. has moved to a nearby community, and the room was filled with unsorted moving boxes, furniture, and art.  The ordered disarray appealed to me.  The ambience at the new location is much warmer, with rich woods instead of cold plaster and tile, and with plentiful windows which let in light from every angle.  I was in heaven during the warm-up drawings, the low sun adding warm tones.  The model chose her own poses during the shorter warm-up sets.  Light from the multiple sources put complex highlights and subtle double shadows on the model’s skin.  As usual, most of the short poses were standing poses or twisting poses, perhaps even a little off-balance, which would be too hard to hold for any duration.  The longer poses were as always,  more stable as a matter of compassion for the model.

For the final pose, the model sat on the stairway to the second floor, where the single light source simplified the shadow patterns.  I sat at the base of the stairs where I could see her from that unusual vantage point.  What interested me the most was the exposed underside of her chin and her upturned nose.  The foreshortening had to be kept subtle even though it felt extreme, with her arm being larger because of its proximity to me.

I am happy with the end result in every respect except for one — it doesn’t look very much like the actual model!  Generally speaking, when drawing a portrait I count it a success if the positions of the eyes, nose, and mouth seem parallel.  Maybe if I practiced portraiture more often, I would be able to capture the likeness better.

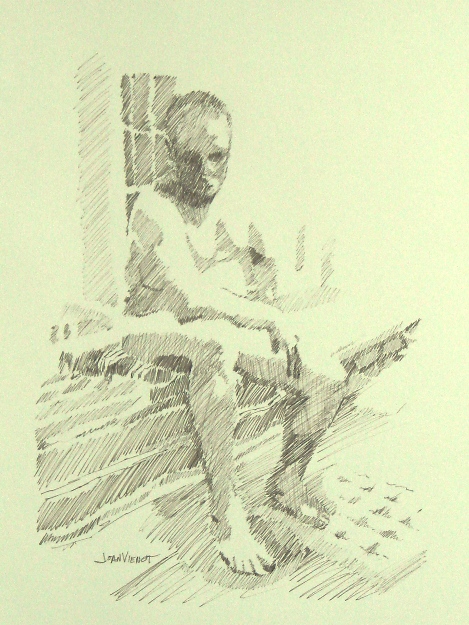
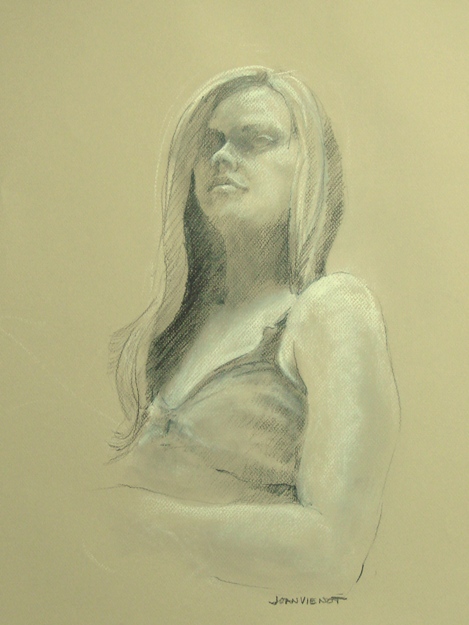
It’s a challenge to create something someone might want to hang in their home.  It seems like the drawing either needs to wow the viewer with technical craftsmanship or else it needs to be someone they know or to remind them of someone they know.  In the end, I draw for my own pleasure and compulsion, trying to simplify what I see, to capture the essential character of the person or the expression I interpreted without concern for whether someone else will like it.

At left is a photo of me making the drawing posted above.

I am excited to announce that a few pieces of my art will be hanging in the lobby/reception area of the South Walton Center of Northwest Florida State College here in Santa Rosa Beach, Florida.  The opening reception will be Friday, April 6, 2012, from 5:00 to 7:00 PM.  Titled “A Passion for Art”, the show spotlights the members of the A+Art Committee which serves under the umbrella of the Cultural Arts Alliance of Walton County.  The show exhibits works by Charlotte Arnold, Lauren Carvalho, Betty Cork, Miffie Hollyday, Susan Lucas, Mike McCarty, Robin Wiesneth, and me, Joan Vienot.  The show will close May 15, 2012.


Most of my images are available for purchase.  Contact me if you are interested. — Joan Vienot

Posted on Leave a comment

Making Mistakes Drawing a Clothed Model

We drew a clothed model at figure drawing at Studio b. this week.  It was challenging.  The striped shirt she wore created contours that helped describe her form, so the stripes had to be believable.  We had quick poses, none exceeding 30 minutes, and several were just 15 minutes.  I have posted a few of them.

The pose at left shows what happens when I fail to correctly proportion the figure in the initial gesture.  With the foreshortening I have shown by making the hips so much larger than the shoulders, the lower legs and feet should be positively huge.  Instead, I drew the lower legs and feet as if they belonged to Tinkerbell.  Mistakes in the initial gesture will remain for the entire drawing and ruin the finished piece.

Below are a couple of other drawings done the same night.  I like how they turned out, even though the distortions and inaccuracies are obvious.  The stool gave me some trouble.  I really don’t like stools — they are hard to draw.  I drew it without really looking at it, and the resulting mistakes can especially be seen in the conflicting and incorrect angles of the cross-bars between the stool legs.  So, either I can try to correct the errors, or just leave them and call them “artistic license”, ha ha!

Posted on Leave a comment

Figure Drawing: The Illusion of Depth, continued

We continued to work with creating the illusion of depth in our figure drawing session at Studio b. again this week.  Instructor Heather Clements reviewed the 4 ways we had been practicing:   size and perspective or foreshortening, degree of development, Mach bands, and value or color contrast.  Our model held a long pose at the end of the session, and I focused on her face in my final drawing.

I love when a face shows elements of one’s life, giving a glimpse of the joys and laughter over the years, and sometimes the pain and fatigue.  This model has a novel in her face.  I wish I had the skill to do it justice.

I drew slowly on this night.  From the beginning of the session to the end I was frustrated with how quickly the poses were over.  I had difficulty clearing my head.  This week marks  the beginning of tourist season here in sunny Northwest  Florida, when my pool service business, my day job, starts occupying my mind 24/7.

Posted on Leave a comment

Blind Contour Figure Drawing

Multiple Blind Contours, Same Pose

A common mistake made by accomplished figure artists as well as novices, is thinking they know how a line or shape should go and failing to look at the subject to see that indeed it might not go that way at all.  Heather Clements, the instructor for Studio b’s figure drawing sessions, is always saying, “Draw what you see, not what you know!”   The artist may know that an arm is a fairly long part of the human anatomy, but when the arm is receding away or coming towards the viewer, it has to be drawn much shorter, because that is how we see it.

Blind Contour Female Reclining on Elbows
Female Reclining on Elbows

Blind Contour Underlay, Female Facing Left

Blind Contour Underlay, Female Gesture Reclining
Female Gesture Reclining

This week we practiced drawing the contours of the model without looking at our paper, an exercise called blind contour drawing.  The purpose is to improve hand-eye coordination and also to help us become better at really seeing the subject, instead of just looking at our paper and drawing how we think the subject looks.  Blind contour drawings usually turn out pretty weird.  Because there is so much detail in hands, feet, and the face, those parts of the drawing often become huge and distorted, like the face I drew in Female Reclining on Elbows.

Later in the session we first drew a blind contour, and then drew another line drawing over it, the second drawing not “blind”.  We repeated the angles and shapes from the blind contour that worked well, and corrected the ones that didn’t.  I drew with a different color in the overlay, so I could see the two different drawings.  It was fun.

Female Seated

Foreshortening forces me to draw what I  see, and not what I know.  In Female Seated, the model’s elbow came straight towards me so I had to draw the arm almost straight even though I knew it was bent.  Similarly, in Female Gesture Reclining, the model’s right knee came directly towards me, foreshortened — the thigh could not be drawn the length that I knew it actually was.  Blind contour drawing helped me to see how I needed to draw it, unhampered by “what I knew.”  Female Gesture Reclining was probably my favorite piece for the session.