Posted on Leave a comment

The Importance of Warming Up in Figure Drawing

I need to warm-up for a little while before my efforts at figure drawing start to flow naturally.  During the initial warm-up period, I try to capture the general directional line of the model, and a few of the light and dark patterns, or perhaps some of the essential contours or textures.  Often it feels like I am drawing a stick figure, just trying to get the general angles and proportions correct.  I draw fast, because our warm-up drawings start with 30-second or 1-minute or two-minute poses.  The model often takes slightly off-balance or less comfortable poses during the warm-up period, knowing that he or she doesn’t have to hold them for long.  I find that effort on the part of the model inspiring, and it motivates me to try harder.  I usually use the broad side of a chalky medium for the warm-up drawings, sometimes even drawing with white nupastel, which helps me to see where the light is striking the model, though white alone usually doesn’t photograph well enough to post here in my blog.  I draw with minimal concern for accuracy, sometimes merely trying to switch gears, from the left-brained thinking about my day-job as I drove to the session, to the right-brain activity of figure drawing.  Drawing is first of all a physical activity, so like an athlete, an artist needs to work at it a little in order to coordinate the hand with the eye, and a period of warm-up drawings helps with that.

As you can see by the examples below, warm-up gestures have strange lines, curves going the wrong direction, places that get overdeveloped, and other places not drawn at all, wrong proportions, and yet an undeniable essence of the figure.  These are warm-up gestures of the same pose from this past week’s figure drawing session at Studio b:  one by me, one by Nancy Nichols Williams, and one by Steve Wagner.

Joan Vienot

Nancy Williams

Steve Wagner

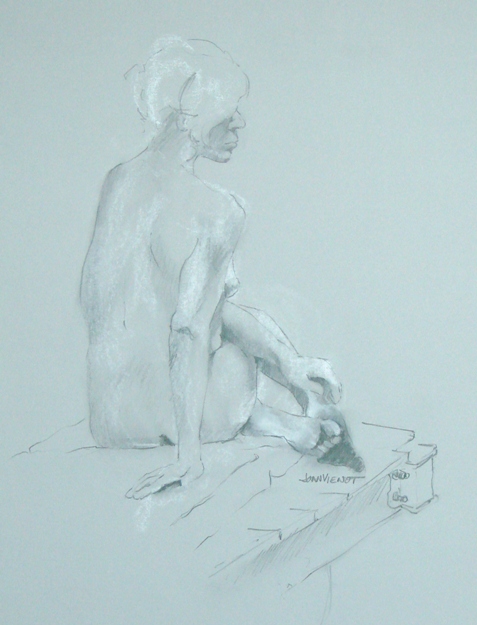
I enjoy the time spent warming-up, but 2-minutes is always too short.  But then too, 5 minutes is too short, and so is 20 minutes, and come to think of it, rarely is a pose long enough for me to feel like I actually finished!  The next drawings include another of my warm-up gestures, and then two longer drawings, perhaps 20-minutes or 30 minutes.  I left early from this session, exhausted from teaching all day, the 2nd of a 2½ day crash-course that I teach at a nearby college, certifying swimming pool operators to meet health department requirements.

Most of my images are available for purchase.  Contact me if you are interested. — Joan Vienot

Posted on Leave a comment

Figure Drawing with Confidence

When I was first learning to draw, as a child, I remember making a myriad of feathery lines to indicate an edge.  Sometimes I still catch myself doing that.  But my drawings are more successful when I draw single, confident lines, whether they are “right” or not.  After all, that’s part of the beauty of present day art — our culture allows and even encourages the artist to be expressive without worrying so much about technical accuracy.  Of course it is nice to have both, but if you have to sacrifice one, I think it is better to sacrifice accuracy in favor of confident expression.

But that is not to say that one should not strive for accuracy and technical merit.  Our model at Studio b. this week was very fit, a specimen, actually, perfect for studying developed musculature.  But none of our poses were long enough to do justice to basic anatomy, so I attempted to describe her muscular development by drawing the outer contours.  The lines are not perfect;  even an untrained eye can see that there are exaggerations and out-and-out “wrong” lines.

In the moment though, in the rush of the 25-minute pose, every line feels perfect, every line is drawn with confidence, the muse shouting at the top of her voice.

Most of my images are available for purchase.  Contact me if you are interested. — Joan Vienot

Posted on Leave a comment

Making Mistakes Drawing a Clothed Model

We drew a clothed model at figure drawing at Studio b. this week.  It was challenging.  The striped shirt she wore created contours that helped describe her form, so the stripes had to be believable.  We had quick poses, none exceeding 30 minutes, and several were just 15 minutes.  I have posted a few of them.

The pose at left shows what happens when I fail to correctly proportion the figure in the initial gesture.  With the foreshortening I have shown by making the hips so much larger than the shoulders, the lower legs and feet should be positively huge.  Instead, I drew the lower legs and feet as if they belonged to Tinkerbell.  Mistakes in the initial gesture will remain for the entire drawing and ruin the finished piece.

Below are a couple of other drawings done the same night.  I like how they turned out, even though the distortions and inaccuracies are obvious.  The stool gave me some trouble.  I really don’t like stools — they are hard to draw.  I drew it without really looking at it, and the resulting mistakes can especially be seen in the conflicting and incorrect angles of the cross-bars between the stool legs.  So, either I can try to correct the errors, or just leave them and call them “artistic license”, ha ha!

Posted on 2 Comments

Practicing with Horizontal Contours to Show Bulk

This week the instructor of Studio b.‘s figure drawing session, Heather Clements, drew horizontal contours around the model’s arms, legs, and waist, to help us see the the bulk of those parts of the figure.  We had some fun making drawings a la Sergio Poddighe, with portions of the figure sliced out and missing.  Then we did some longer poses, and I very much enjoyed drawing contours of the figure without a lot of shading, letting my lines express the volumes instead of light and shadow.  The practice with contours earlier in the session helped me to see the shapes better.

Posted on Leave a comment

Figure Drawing from Warm-Up to Extended Pose

I arrived at the Figure Drawing session fairly exhausted this week, being in the middle of teaching a 2½ day crash course for one of my businesses (a certification course for operators of public swimming pools).  Counting me, only 3 artists were there at Studio b., plus the instructor, Heather Clements, and the owner, Colleen Duffley.  The model was unable to make it, so Heather modeled for us without disrobing.

It takes me a while to “learn” a new figure’s shape and proportions.  I focused on contours the whole night.  In this post I have decided to show examples of my work throughout the whole session, from initial 1-minute and 2-minute gestures to the final 20-minute line drawings.  Clicking on the picture will give an enlarged view.

As usual, though I arrived exhausted, I left energized by the thrill of expression.

Collection of Briana Sanderson

Posted on Leave a comment

Blind Contour Figure Drawing

Multiple Blind Contours, Same Pose

A common mistake made by accomplished figure artists as well as novices, is thinking they know how a line or shape should go and failing to look at the subject to see that indeed it might not go that way at all.  Heather Clements, the instructor for Studio b’s figure drawing sessions, is always saying, “Draw what you see, not what you know!”   The artist may know that an arm is a fairly long part of the human anatomy, but when the arm is receding away or coming towards the viewer, it has to be drawn much shorter, because that is how we see it.

Blind Contour Female Reclining on Elbows
Female Reclining on Elbows

Blind Contour Underlay, Female Facing Left

Blind Contour Underlay, Female Gesture Reclining
Female Gesture Reclining

This week we practiced drawing the contours of the model without looking at our paper, an exercise called blind contour drawing.  The purpose is to improve hand-eye coordination and also to help us become better at really seeing the subject, instead of just looking at our paper and drawing how we think the subject looks.  Blind contour drawings usually turn out pretty weird.  Because there is so much detail in hands, feet, and the face, those parts of the drawing often become huge and distorted, like the face I drew in Female Reclining on Elbows.

Later in the session we first drew a blind contour, and then drew another line drawing over it, the second drawing not “blind”.  We repeated the angles and shapes from the blind contour that worked well, and corrected the ones that didn’t.  I drew with a different color in the overlay, so I could see the two different drawings.  It was fun.

Female Seated

Foreshortening forces me to draw what I  see, and not what I know.  In Female Seated, the model’s elbow came straight towards me so I had to draw the arm almost straight even though I knew it was bent.  Similarly, in Female Gesture Reclining, the model’s right knee came directly towards me, foreshortened — the thigh could not be drawn the length that I knew it actually was.  Blind contour drawing helped me to see how I needed to draw it, unhampered by “what I knew.”  Female Gesture Reclining was probably my favorite piece for the session.