We had a live model posing for the portrait workshop I am taking from Charlotte Arnold, and for our final drawing this week we had the luxury of a longer pose. When I am figure drawing, I need to try to get the whole figure drawn, or at least much of it as I can, which doesn’t allow much time on any one part of the body. So getting more than 30 minutes to draw just a face in the portrait workshop was extraordinary. The drawing is still unfinished because I spent the whole time on the face.
At our figure drawing session at Studio b. this week, we returned to the shorter poses and a familiar model. I was able to capture bits and pieces of a likeness of her face, but only in a rough and hurried fashion, nothing worth showing. But that showed me I am making progress with the portrait workshop I am taking. I have posted only one drawing from the session, a simple one, just lines, one that captured the essence of that particular pose.
We had a new model at figure drawing at Studio b. this week. Every model brings his or her own energy to the session, which adds to the excitement. This model took a very wide variety of poses, some extremely energetic and ambitious, and others very natural and relaxed. I enjoyed the variety and contrast. I’ve begun taking a course on head studies and portraiture, so I tried to pay a little more attention to the facial features and attitude. It never ceases to amaze me how I can make a passable effort until I focus and try to do a good job, and then it is as if I had never seen a pencil before, it turns out so badly.
Our instructor, Heather Clements, suggested we take a different approach to the initial gesture, and I will try to learn how to do that. Her suggestion was to in effect draw a stick figure or a stick-skeleton, which can be roughed in fairly quickly to establish the overall directional line and then the individual limbs and sections of the body. Once the “armature” is established, it is easier to compare relationships of one part to another, and then to make corrections.
As always with new models, I struggled trying to learn how to draw him. You would not think there would be that much difference from one figure to the next, but there are worlds of difference. We’ve been rotating models for a while a Studio b., so that we don’t return to a previous model for perhaps as long as 8 weeks, unless one has to fill in for another. That has added to the challenge for me. When I am struggling, I learn more.
Last week I had started a portrait in an open studio session I attended in order to get some time practicing for the Charlotte Arnold workshop I am taking on Tuesdays. At right is the finished piece. I am satisfied with it as a finished drawing, even though I didn’t capture the model’s exquisite beauty. There was much about this drawing that felt very new while I was working it, the fine dreadlocks in particular.
This week our instructor asked us to pick a drawing from a book and try to draw it exactly the way the artist had, using the same media. I picked a drawing by Nicholai Fechin. I am not very comfortable with charcoal, his medium for this drawing — left to my own choice, I would have used a pencil. The drawing I am posting, is my third try. The original copy from the book is on the left, and my copy is on the right.
One of the points of blogging about my art is to show my struggles, my occasional two-steps-backwards, as well as my one-step-forward. So I bravely display my struggling efforts towards gaining some competence with portraiture. I attended an open studio session today, to practice drawing a face. The model stayed in the same pose throughout the 3-hour session, taking 5-minute breaks every half-hour or so. I think that drawing “Plane Man” two days ago helped me to see form, highlights, and shadows. I used the first half-hour to warm-up, using nupastels to make a full-color sketch.
Then I settled in and spent the next 3 segments using a soft graphite on Canson Rives paper that Charlotte gave me to try out. I’ve used Canson Edition, and I liked Canson Rives even better. Tooth is a texture in the paper that “grabs” onto the media, and makes it easy to make marks. The tooth on the Rives paper was excellent, and one side had more texture than the other. I nearly finished the drawing at left. There are some obvious problems, places that actually make me wince as I review it, like the white line showing the leading edge of her neck, which grows strangely out of the reflected light under her chin. I will have to work on that some more. And I doubt anyone would recognize the model from my drawing, since I made her face, and especially her eyes, too narrow. But I did do a fair job of suggesting her beautiful dreadlocks.
Unfinished, Nupastel and Graphtint
There was one last 30-minute segment left in the session, and I used that time to start a drawing of her profile, from just a few feet away. I started with the white highlights, allowing the paper to show through for some of the midtones, and then I used a reddish-brown tinted graphite pencil to create the darker values. But I didn’t even get to start on her hair before it was time to pack up. If I finish this drawing, then I will decide whether to darken or wash out the graphtint for effect or to improve the representation. Graphtint is a fun pencil, not as “washable” as a watercolor pencil, but able to be washed somewhat, to create a more watery effect which can be much softer than the pencil strokes alone. It brightens the color when wet. My apologies for the orange tone of the piece — it’s not orange at all, but rather a light brown.
We drew a clothed model at figure drawing at Studio b. this week. It was challenging. The striped shirt she wore created contours that helped describe her form, so the stripes had to be believable. We had quick poses, none exceeding 30 minutes, and several were just 15 minutes. I have posted a few of them.
The pose at left shows what happens when I fail to correctly proportion the figure in the initial gesture. With the foreshortening I have shown by making the hips so much larger than the shoulders, the lower legs and feet should be positively huge. Instead, I drew the lower legs and feet as if they belonged to Tinkerbell. Mistakes in the initial gesture will remain for the entire drawing and ruin the finished piece.
Below are a couple of other drawings done the same night. I like how they turned out, even though the distortions and inaccuracies are obvious. The stool gave me some trouble. I really don’t like stools — they are hard to draw. I drew it without really looking at it, and the resulting mistakes can especially be seen in the conflicting and incorrect angles of the cross-bars between the stool legs. So, either I can try to correct the errors, or just leave them and call them “artistic license”, ha ha!
Craftsmanship is different from art. Craftsmanship is a familiarity and skill with subject and media. I do a lot of work to try to improve my craftsmanship. I think the craft of drawing is really an exercise in seeing. By practicing, of course I am practicing with various media and subject matter or poses, but what I really am doing is learning to see better. Today I started a 5-week, 3-hours per week, portrait workshop taught by Charlotte Arnold in Destin, Florida. I’m not actually interested in drawing portraits, which is fortunate given that symmetry escapes me, but I would like a better understanding of how to draw the head for my figurative works.
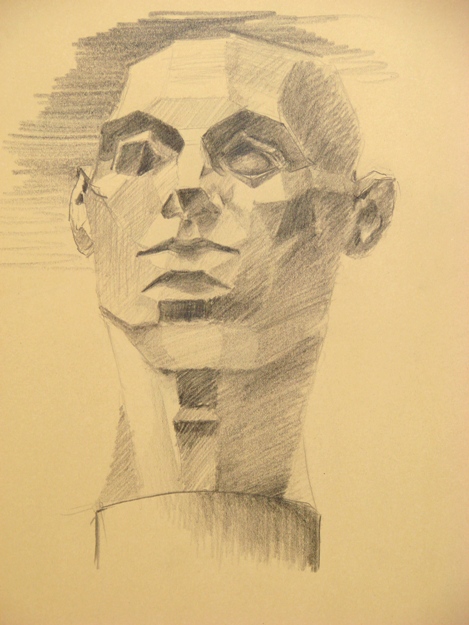
Plane Man: Graphite
Charlotte referenced the 10,000 Hour Rule, which says in essence that if you practice anything for 10,000 hours, you are bound to get better at it. She suggested we keep a sketchbook with us at all times, and to practice all the time, drawing ellipses if not actually representational subjects.
She brought in a life-sized plaster cast called Plane Man and set a floodlight on it, for us to draw from various angles. I’d never actually seen Plane Man before, except in art supply magazines. I probably should have picked it up and touched the various planes, to learn a little more about it before I started drawing it, but I just drew whatever I could see. Some of the planes were indistinguishable from the adjacent planes because of the lighting, and the rest were much more obvious in the white plaster than they are in a person’s face. Charlotte said that if we learn the angles on the Plane Man, we will know what to look for when attempting a portrait.
One half of Plane Man’s face was made of very angular planes, and on the other half the angles were more subtle, with maybe a hint of a curve here and there. I drew on manilla paper, not intending to keep them except for a before-and-after reference that I can look at when the course is over.
Portrait workshop instructor Charlotte Arnold recently moved back to the area after being gone for nearly 8 years. She has spent the last 4 years in the Chicago area studying and working in the open studios at The Palette and Chisel Academy of Fine Art in Chicago where she is an Artist Member. She is also a member of the Oil Painters of America, Portrait Society of America, Portrait Society of Florida, Women Artists of the Southeast, and Society of Children’s Book Writers and Illustrators. www.charlottearnoldfineart.com
In the last post I showed the drawing above left, which I was unable to finish during the 30-minute pose. I worked on it a little this evening, to give the hair, arms, and hands some form. Without seeing the light on the form, I suppose my effort is passable, but the experience was hollow. It felt like mere craftsmanship as I worked in my studio, without the power and intimacy of a live figure drawing session.
Unless the artist is there to talk about the work, ordinarily the viewer of a piece of art is far removed from the process — all he or she sees is the product. But for me as the artist, at least 50% of the value of a figure drawing is in the process, in the capture of light and shadow across the living form. Otherwise, why attend organized sessions and pay a model? After all, there are countless photographs of people in every conceivable position, if it were just a matter of transposing a form onto the paper. My joy is in the moment, with the actual lighting, the model, and the creative energy of the group.
All that said, I wish I had a photo so I could have finished the head and arms with more confidence!
Every week I participate with other artists in the figure drawing sessions at Colleen Duffley‘s Studio b., in Alys Beach, Florida. This week our instructor, Heather Clements, placed the model on a table in front of us. Normally the model poses on the floor or on a short platform.
I struggled throughout the entire session, because all of the shapes I was used to seeing, looked completely different from this lower perspective. It took me twice as long to draw anything, even in my warm-up drawings. I have included a few here, below, to prove my A for effort. I was only half-finished with the last pose when Heather called Time! at the end of the session. I have posted it above left, unfinished, and will post the finished piece later if I don’t ruin it. There is a good chance of that happening, because I won’t have the model there for a reference. I don’t take photos of the model — some artists do, but I prefer the pressure and power of live figure drawing. Of course that is a serious drawback, if I haven’t finished the drawing by the end of the pose.
In drawing that final pose, I broke the rules of figure drawing. One of the essential things to strive for, is equal development of the drawing so that if interrupted at any single point, the drawing will be developed as a whole. Anyone can see that I was working my way from the top of the page on down, instead of the whole page all at once.
Our model this week was extremely fit, and that added to the challenge. Perfect musculature has to be drawn fairly accurately, or it will look very wrong.
Adding to my general discomfort was my pollen allergy. The local pines are in full bloom, and pollen is everywhere this year, even inside my house! Of course that’s my fault for having the windows open, but who can resist, when the springtime days approach 70º!
Heather, the instructor, as usual, was incredibly prolific and “spot-on” with her ink drawings. Talk about confidence. I bet she does crossword puzzles with a pen too! Click here to see her art from this same session.
The top three drawings are Nupastel and graphite on Stonehenge paper. The reclining pose uses tinted graphite, which intensifies in color when dampened.

 We had a live model posing for the portrait workshop I am taking from Charlotte Arnold, and for our final drawing this week we had the luxury of a longer pose. When I am figure drawing, I need to try to get the whole figure drawn, or at least much of it as I can, which doesn’t allow much time on any one part of the body. So getting more than 30 minutes to draw just a face in the portrait workshop was extraordinary. The drawing is still unfinished because I spent the whole time on the face.